If you would rather watch this, get a gentle introduction to DSPy out on youtube
A gentle introduction to DSPy
DSPy has taken the world by storm.
It's the most popular Stanford Open Source project and one that is changing how people are building apps on large language models.
However, it's hard to learn, get started, and understand. Especially if you're not familiar with the basics.
This blog post aims to change that. We'll provide a gentle introduction to DSPy.
We'll start by explaining what DSPy is and the key benefits it offers. Then, we'll walk through a simple example of using DSPy to translate text to "Grug speak."
Along the way, we'll highlight important concepts like building datasets, defining prompts, and zero-shot prompting. Finally, we'll show you how to measure and optimize prompts automatically.
We'll show how DSPy makes this process more data-driven and systematic, allowing us to fine-tune our models to achieve better results.
By the end of this post, you'll have a solid understanding of how DSPy works and how to approach building basic DSPy programs.
Introduction
We've all been there - you have a great idea for a project that could really benefit from the power of large language models (LMs), but the process of actually working with them can feel like navigating a minefield. From figuring out the right prompts to getting consistent and reliable outputs, it's easy to get bogged down in the details rather than focusing on your core objectives.
There's a lot of manual tweaking. Prompt engineering. Tipping. Tuning. It's a mess.
DSPy aims to change that by providing a more systematic approach.
That's where DSPy comes in. DSPy is a new framework that makes working with LMs more systematic and powerful.
By separating the flow of your program (the modules) from the parameters (the prompts and weights), DSPy allows you to focus on defining your high-level logic while leaving the fine-tuning of the LM to specialized optimizers.
In this post, we'll take a gentle introduction to DSPy and walk through a simple example of using it to translate text to "Grug speak." Along the way, we'll explore how DSPy's approach and optimization capabilities can help you build more reliable and powerful applications on top of large language models.
What is DSPy?
DSPy, short for "Demonstrate-Search-Predict" (originally), is a framework that gives us a systematic way to work with large language models (LLMs). At a high level, DSPy separates the flow of our program (the modules and logic) from the parameters (e.g., prompts) that control an LLM's behavior.
This allows us to easily experiment with different prompts, tune them, and measure the performance without having to rewrite our core application logic. DSPy can even write prompts for us!
This means, ideally, that we can focus on defining what we want the model to do, and let DSPy handle the details of making it work reliably. By decoupling the program flow from the model parameters, and providing optimization tools, DSPy tries to reduce our reliance on specific LLMs.
It also means that we can move from model to model reliably.
We can build robust applications that leverage the power of these models without getting bogged down in the complexities of prompt engineering and model fine-tuning. This makes the process of working with LLMs much more systematic and productive.
In the following sections, we'll walk through a simple example of using DSPy to translate text to "Grug speak", and then explore how to measure and optimize the model's performance on our specific use case.
A Simple Example: Translating to Grug Speak
Let's walk through an example use case of using DSPy to translate text to "Grug speak". This will help illustrate the key concepts and steps involved.
This was written in a Jupyter notebook, so we're going to load some extensions and our environment variables.
%load_ext autoreload
%autoreload 2
from dotenv import load_dotenv
load_dotenv()Datasets
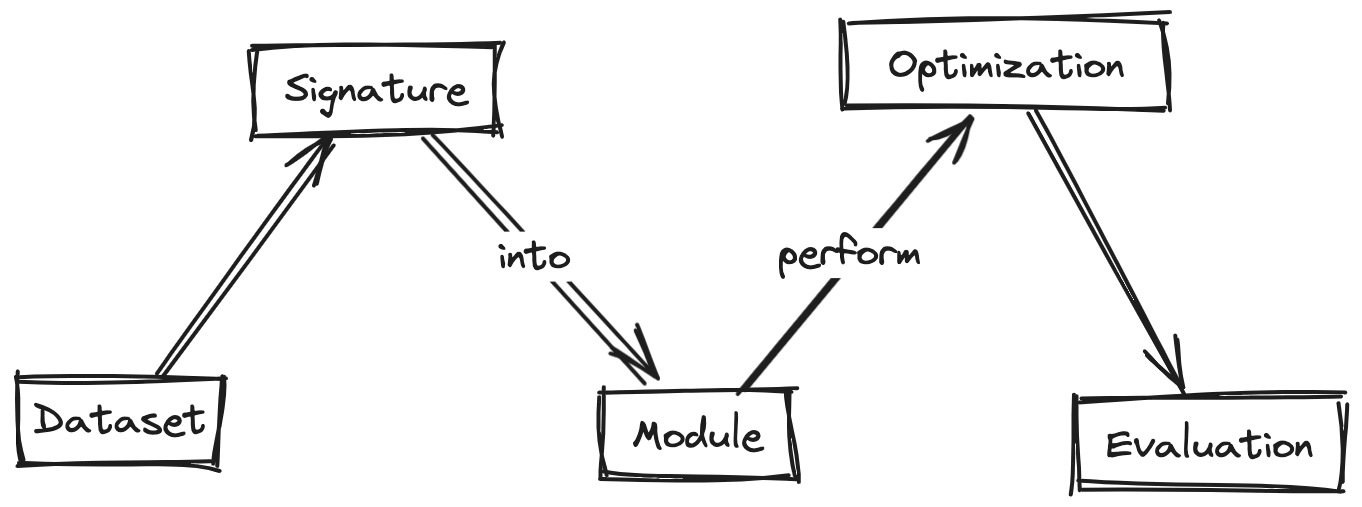
Probably the most critical aspect of DSPy is that you're going to need a dataset of some sort. When I work with beginners getting started with DSPy, this is probably the biggest gap or point of confusion for people.
In this example, we're going to use / refer to an amazing article:
The Grug Brained Developer A layman's guide to thinking like the self-aware smol brained

First, we need to build a dataset of Grug speak examples. To do this, we are going to scrape the original grug brain website, which contains text written in the Grug language:
import requests
from bs4 import BeautifulSoup
import dspy
res = requests.get("https://grugbrain.dev/")
soup = BeautifulSoup(res.text, 'html.parser')
raw_text = [p.text for p in soup.find_all('p') if p.text]raw_text[:10]Now that we have some sample Grug text, we need a way to translate it to plain English. I wrote a simple function to do this here:
from openai import OpenAI
client = OpenAI()
openai_model_name= "gpt-3.5-turbo"
class BuildMessages:
    def __init__(self, system_prompt, user_prompt):
        self.system_prompt = system_prompt
        self.user_prompt = user_prompt
    def render(self, **kwargs):
        sys = self.system_prompt.format(**kwargs)
        user = self.user_prompt.format(**kwargs)
        return [
            {"role":"system", "content":sys},
            {"role":"user", "content":user},
        ]
from functools import cache
@cache
def translate_grug(grug_text):
    prompt = BuildMessages(
    "You are an expert in deciphering strange text. The user will provide text written by someone named Grug and you will provide the translation.",
    """Translate the following text into plain english: '{text}'.

    Do not respond with any other text. Only provide that text. Now take a deep breath and begin."""
)
    result = client.chat.completions.create(messages=prompt.render(text=grug_text), model=openai_model_name)
    return result.choices[0].message.content
We can now build our dataset by translating the first 10 Grug text samples.
dataset = []
for grug_text in raw_text[:10]:
    translated = translate_grug(grug_text)
    dataset.append({"grug_text":grug_text, "plain_english":translated})
This is our base dataset of Grug text and the "translation". To use this in DSPy, we're going to need to create a list of dspy.Example objects from the dataset:
examples = []
for row in dataset:
    examples.append(dspy.Example(grug_text=row["grug_text"], plain_english=row["plain_english"]).with_inputs("plain_english"))
The key insight here is that we're creating a set of Examples that DSPy is going to use on our behalf to do future translations. We're specifying an input of "plain english" and getting back grug text.
We tell DSPy about the inputs for our examples by calling with_inputs("plain_english").
We can then split the examples into training and test sets:
import numpy as np
from random import shuffle
def split_for_train_test(values, test_size = 1/3.0):
    shuffle(values)
    train = int(len(values)-test_size*len(values))
    print(train)
    return values[:train], values[train:]
train, test = split_for_train_test(examples)
Let's take a look at the first training example:
train[0]Defining Signatures (or prompts)
Now conceptually Signatures are a little like prompts.
https://twitter.com/bllchmbrs/status/1783900099460141307
Think of Signatures like task specifications. You've got input, you've got output, and a simple prompt (as the docstring) to describe the task.
Let's create that for our Grug text.
import dspy
class GrugTranslation(dspy.Signature):
    "Translate plain english to Grug text."
    plain_english = dspy.InputField()
    grug_text = dspy.OutputField()
One thing that caught me up when using DSPy was how to debug this. We know that, at some point, this is getting passed into a language model and after digging around in the code, I found that you can print the string representation of the signature:
turbo = dspy.OpenAI(model='gpt-3.5-turbo', max_tokens=1000)
dspy.settings.configure(lm=turbo)
from dspy.signatures.signature import signature_to_template
grug_translation_as_template = signature_to_template(GrugTranslation)
print(str(grug_translation_as_template))
print(grug_translation_as_template.query(examples[0]))
GrugTranslation.signature
GrugTranslation.with_instructions
This is not a perfect representation of the prompt, but it's a good start.
Defining a module
DSPy uses modules to encapsulate the logic for a specific task. This module will take plain English text as input and return the corresponding Grug text when we call the forward method.
class CoT(dspy.Module):
    def __init__(self):
        super().__init__()
        self.prog = dspy.ChainOfThought(GrugTranslation)

    def forward(self, plain_english):
        return self.prog(plain_english=plain_english)
c = CoT()
DSPy modules are just python. We can add new methods, our own code, whatever. No crazy abstractions.
What's powerful here is the ChainOfThought class. Rather than manually specifying to the model that we want it to follow chain of thought, we just call that higher level abstraction and DSPy will take care of it for us.
I will say that this can be a little finicky.
So far we've covered the basics. We started by gathering data, then defined our translation task as a signature, and finally wrapped it in a reusable module.
This systematic approach allows us to easily experiment, measure performance, and optimize the translation model.
Before optimizing it we can run a zero shot forward pass:
c.forward("You should not construct complex systems.")This will give us the models best guess at what the Grug text should be.
Measuring and Optimizing Performance
So far, we've done basic prompt engineering. Nothing particularly fancy.
A core pillar of DSPy's capabilities is optimization. We can define custom metrics and use them to fine-tune our models, allowing for a more systematic and data-driven approach. Let's explore how to define custom metrics and use them to fine-tune our models.
Now for our Grug text, we're going to need some metrics to optimize against.
Metric 1: Readability
Because of my work on Hyperlint, I've thought a lot about metrics for readability. One of the most common metrics for readability is the Automated Readability Index (ARI), which is a formula that produces a score that approximates the grade level needed to understand the text.
It's not perfect, but it's a good start.
# https://apps.dtic.mil/sti/tr/pdf/AD0667273.pdf
def automated_readability_index(text):
    import re
    characters = len(re.sub(r'\s+', '', text)) # Count characters (ignoring whitespace)
    words = len(text.split()) # Count words by splitting the text
    # Count sentences by finding period, exclamation, or question mark
    sentences = len(re.findall(r'[.!?\n]', text))
    # small change is to add a new line character as grug doesn't seem to use punctuation.
    if words == 0 or sentences == 0:  # Prevent division by zero
        return 0
    # Calculate the Automated Readability Index (ARI)
    ari = (4.71 * (characters / words)) + (0.5 * (words / sentences)) - 21.43

    return round(ari, 2)
We can then use this function to compare the readability of the original text and the "Grug speak" translation.
for ex in examples:
    source_ari = automated_readability_index(ex.plain_english)
    grug_ari = automated_readability_index(ex.grug_text)
    print(f"ARI {source_ari} => {grug_ari}")
You'll see a bunch of metric values here but basically Grug isn't speaking in the most sophisticated way (who would have thought).
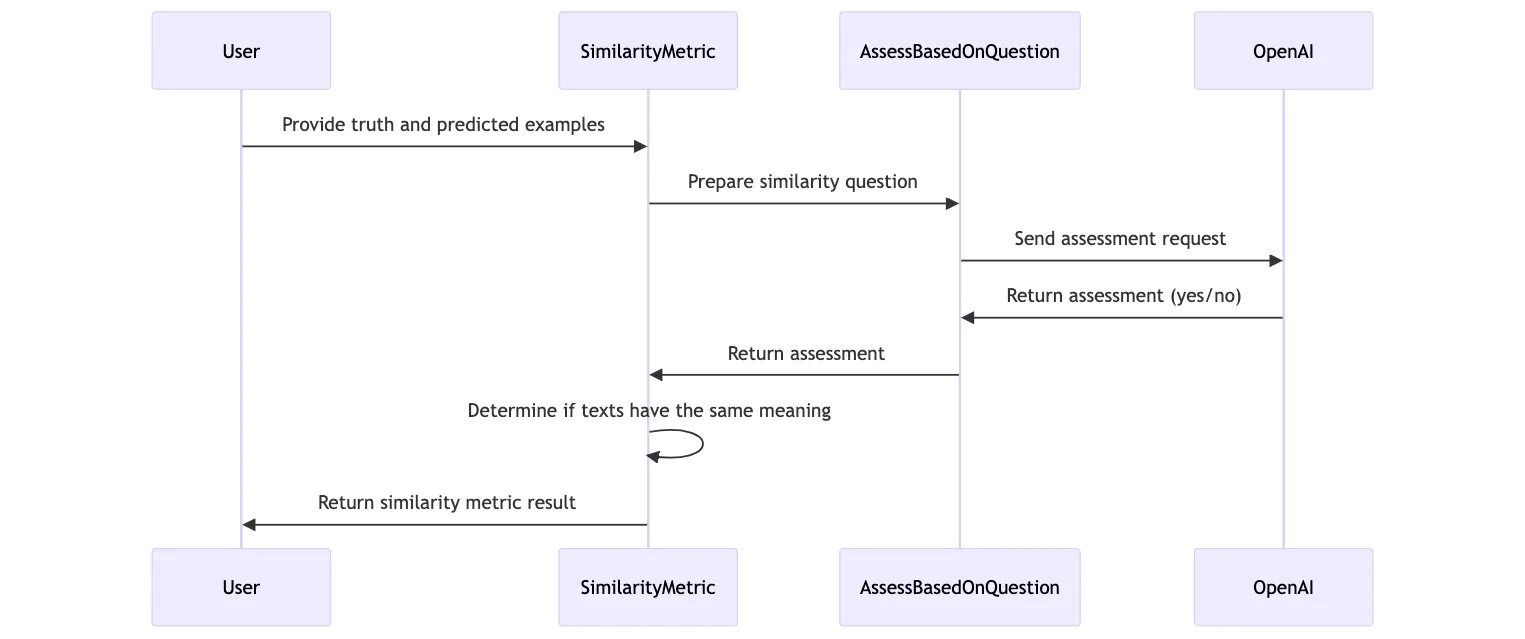
Metric 2: AI Feedback
Another important metric we'll consider is semantic similarity, which measures how closely the meaning of the translated text matches the original.
Let's do that now and use AI to assess the output as well.
# https://dspy-docs.vercel.app/docs/building-blocks/metrics#intermediate-using-ai-feedback-for-your-metric
class AssessBasedOnQuestion(dspy.Signature):
    """Given the assessed text provide a yes or no to the assessment question."""
    assessed_text = dspy.InputField(format=str)
    assessment_question = dspy.InputField(format=str)
    assessment_answer = dspy.OutputField(desc="Yes or No")
example_question_assessment = dspy.Example(assessed_text="This is a test.", assessment_question="Is this a test?", assessment_answer="Yes").with_inputs("assessed_text", "assessment_question")
print(signature_to_template(AssessBasedOnQuestion).query(example_question_assessment))Note: the example_question_assessment object is technically a Prediction object, but it mirrors the functionality of an Example.
Now we can actually define a similarity metric. This metric takes in a truth and a prediction and uses AI feedback to assess the semantic similarity between the two texts.
We're using GPT4-Turbo here, but you could use any model you have access to.
gpt4T = dspy.OpenAI(model='gpt-4-turbo', max_tokens=500)
def similarity_metric(truth, pred, trace=None):
    truth_grug_text = truth.grug_text
    proposed_grug_text = pred.grug_text
    similarity_question = f"""Does the assessed text have the same meaning as the gold_standard text provided?
Gold Standard: "{truth_grug_text}"
Provide only a yes or no answer."""
    with dspy.context(lm=gpt4T):
        assessor = dspy.Predict(AssessBasedOnQuestion)
        raw_similarity_result = assessor(assessed_text=proposed_grug_text, assessment_question=similarity_question)
    print(raw_similarity_result) # for debugging
    raw_similarity = raw_similarity_result.assessment_answer.lower().strip()
    same_meaning = raw_similarity == 'yes'
    return same_meaning
You'll notice that we had to specify a truth and a pred parameter. This is the standard inteface for any metric that DSPy will use for optimization.
def ari_metric(truth, pred, trace=None):
    truth_grug_text = truth.grug_text
    proposed_grug_text = pred.grug_text

    gold_ari = automated_readability_index(truth_grug_text)
    pred_ari = automated_readability_index(proposed_grug_text)
    print(f"ARI {gold_ari} => {pred_ari}")
    ari_result = pred_ari <= 7.01
    return ari_result
Now, we've defined those two metrics. We can combine them into an overall performance metric that evaluates both readability and semantic similarity.
def overall_metric(provided_example, predicted, trace=None):
    similarity = similarity_metric(provided_example, predicted, trace)
    ari = ari_metric(provided_example, predicted, trace)
    if similarity and ari:
        return True
    return False
Visually, think about it like this:
We can now use optimization techniques like few-shot learning to fine-tune our models and improve their performance.
This allows us to take a more systematic, data-driven approach to working with language models.
Running the Optimization
Now we will run the optimization process. We specify the optimizer, and compile it using our Module and the data.
from dspy.teleprompt import BootstrapFewShot
config = dict(max_bootstrapped_demos=4, max_labeled_demos=4)
optimizer = BootstrapFewShot(metric=overall_metric, **config)
optimizer.max_errors = 1 # helpful to debug errors faster
optimized_cot = optimizer.compile(CoT(), trainset=train, valset=test)
This shouldn't take too long if you kept it on the sample dataset.
One thing to note is that DSPy will automatically cache model API calls.
Evaluating our output
Now we need to evaluate! We can use the Evaluate class to run our metrics on the optimized model.
In this case, we're going to print out the results for both individual metrics. I do this to help us see where we're observing issues.
from dspy.evaluate import Evaluate
individual_metrics = [similarity_metric, ari_metric]
for metric in individual_metrics:
    evaluate = Evaluate(metric=metric, devset=train, num_threads=1, display_progress=True, display_table=5)
    evaluate(optimized_cot)
We can (obviously) manually inspect the output as well.
optimized_cot.forward("You should not construct complex systems.")Lastly, we can save the model for future use:
optimized_cot.save(path="/tmp/model.json")Conclusion
In this post, we've provided a gentle introduction to DSPy, a powerful framework systematizes the process of working with large language models.
We've seen how DSPy allows us to separate the flow of our programs from the parameters that control the model's behavior, and how this enables a more data-driven and optimizable approach.
Through the example of translating text to "Grug speak", we've demonstrated how DSPy makes it easy to:
- build datasets
- define prompts
- and measure and optimize performance using custom metrics.
This systematic approach allows us to create more reliable and effective language models that fade into the background, empowering us to focus on our core tasks and objectives.
For instance, if you wanted to move this model directly to Haiku, the move would be absolutely trivial (and we'll cover that in a future post).
If you're excited to get started with DSPy, I encourage you to check out the project's documentation and resources.
In future posts, we'll dive even deeper into topics like prompt optimization, fine-tuning, Suggestions, Assertions and other advanced use cases.
If you like this content, follow me on twitter for more! I'm posting all week about DSPy and providing a lot of "hard earned" lessons that I've gotten from learning the material.