A first attempt at DSPy Agents from scratch
This post is going to take a first pass at creating Agents from scratch, using DSPy.
The goal here is education, don't use this in production. It's an exploration into how you might approach it.
Side note: what do I mean by Agents? There's a lot of differing definitions in industry, I'm going with...
- Independent (relatively) agents that can do stuff
- They have access to tools.
- They can plan and execute tasks.

Introduction
In this blog post, I'm going to try and build Agents in DSPy. This is really more of an agent "framework" but you get the point.
The goal of this tutorial is to guide you through the process of building a simple agent application using DSPy. Since DSPy is not an agent framework, this is really more of a "what does DSPy give you and what doesn't it give you" kind of post.
By the end of this post, you'll have an understanding of the key concepts, such as Plans, Workers, and Tools, and how they might work together to create a functional agent system.
The key takeaways you'll learn from this post include:
- How you might structure Agents in DSPy
- How DSPy is really just python - and you should think about it as such.
By the end of this tutorial, you'll at least have A perspective for building your own agent applications using DSPy, and you'll be equipped with the knowledge to explore further extensions and optimizations.
Note: This is totally different from something like reAct. This is us defining agents from scratch at a lower level.
Setting up the Environment
We'll start by setting up the necessary environment for our DSPy agent application. First, we'll load the autoreload extension to ensure our code changes are automatically reloaded.
We'll load environment variables, define our models.
from dotenv import load_dotenv
load_dotenv()
I'm using LLMClient, so I set my api_base accordingly.
import dspy
import instructor
wrkr = dspy.OpenAI(model='gpt-3.5-turbo', max_tokens=1000, api_base='http://0.0.0.0:4000', model_type="chat")
bss = dspy.OpenAI(model='gpt-4-turbo', max_tokens=1000, api_base='http://0.0.0.0:4000', model_type="chat")
dspy.configure(lm=wrkr) # our default
from typing import List, Any, Callable, Optional
from pydantic import BaseModelDefining the Plan Signature
In this section, we'll introduce the concept of a "Plan" Signature.
class Plan(dspy.Signature):
    """Produce a step by step plan to perform the task.
The plan needs to be in markdown format and should be broken down into big steps (with ## headings) and sub-steps beneath those.
When thinking about your plan, be sure to think about the tools at your disposal and include them in your plan.
    """
    task = dspy.InputField(prefix="Task", desc="The task")
    context = dspy.InputField(format=str, desc="The context around the plan")
    proposed_plan = dspy.OutputField(desc="The proposed, step by step execution plan.")
The Plan class inherits from dspy.Signature, which is the base class for defining input and output fields in DSPy. The class has three fields:
task: This is an input field that represents the task that needs to be planned.context: This is another input field that represents the context around the plan. It is of typestr, so it can be multiple lines.proposed_plan: This is an output field that will contain the step-by-step execution plan.
The docstring for the Plan class explains that the proposed plan should be in Markdown format, with top-level steps denoted by ## headings and sub-steps beneath those.
This Plan class will serve as the foundation for defining the planning logic in our agent application.
Creating a Basic Worker
We'll now introduce the concept of a Worker in our agent application. The Worker class is responsible for handling the planning and execution of tasks assigned to it.
We give the worker with a role and a list of tools that the worker has access to. We store a string representation of the tool descriptions, which will be useful for providing context to the worker when planning and executing tasks.
I added history here, although I didn't end up using it. I think this is where I would store it, but I'm not 100% sure.
The forward method is the main entry point for the worker.
The more I think about it, the more I realize forward is really just a remnant of "DSPy is like PyTorch" - this could really be any function.
We first create a context string that includes the worker's role and the descriptions of the available tools. We then pass this context and the task to the plan method, which returns a result object containing the proposed plan. Finally, we print the proposed plan to the console, so we can see the worker's "thought process".
class Worker(dspy.Module):
    def __init__(self, role:str, tools:List):
        self.role = role
        self.tools = tools
        self.tool_descriptions = "\n".join([f"- {t.name}: {t.description}. To use this tool please provide: `{t.requires}`" for t in tools])
        self.plan = dspy.ChainOfThought(Plan)
    def forward(self, task:str):
        context = f"{self.role}\n{self.tool_descriptions}"
        input_args = dict(
            context = context,
            task = task
        ) # just did args for printing for debugging
        result = self.plan(**input_args)
        print(result.proposed_plan)
Defining Tools
We'll now introduce the concept of Tools in our agent application. Tools are specialized capabilities that our agents can use to accomplish tasks. Each Tool has a name, a description, a list of required inputs, and a function that performs the actual work. The Tool class is defined as follows:
class Tool(BaseModel):
    name: str
    description: str
    requires: str
    func: Callable
Note: This is a ghetto approach. DSPy doesn't using function calling (e.g., from OpenAI) under the hood, so we basically have to define our own function calls. I'm not sure what the best way to do this is but in the spirit of a "hackathon", I just did.
Most params are self-explanatory, but the requires field specifies the input(s) needed for the tool to function. And the func field is a callable that takes the required input(s) and returns the result of using the tool.
To demonstrate how Tools work, let's create a few test tools:
Note: This is a simple approach. DSPy doesn't using function calling (e.g., from OpenAI) under the hood, so we basically have to define our own function calls. I'm not sure what the best way to do this is but in the spirit of a "hackathon", I just did.
test_tools = [
    Tool(name="phone", description="a way of making phone calls", requires="phone_number", func=lambda x: "they've got time"),
    Tool(name="local business lookup", description="Look up businesses by category", requires="business category", func=lambda x: "Bills landscaping: 415-555-5555")
]
We can then use these tools within our agent application. For instance, we can create a Worker and have it use the test tools to try and accomplish a task:
with dspy.context(lm=wrkr):
    Worker("assistant", test_tools).forward("get this yard cleaned up.")
# you'll see output you might expect.
This demonstrates how Tools can be integrated into the agent application to provide specialized capabilities that can be leveraged to complete tasks. In the next section, we'll try to take it to the next level.
Improving the Worker Class
We've introduced the basic Worker class, but to make our agent application more robust, we'll need to improve the Worker class. In the updated Worker2 class, we've added two new methods: plan and execute.
The plan method is responsible for generating a proposed plan of action for a given task.
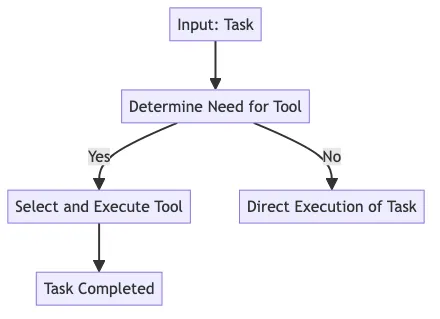
The execute method is responsible for carrying out the planned actions. It first checks if the task can be completed without using any tools. If that's the case, it simply returns a success message. Otherwise, it uses the ChainOfThought module in DSPy again to determine which tool is needed and what arguments to provide to that tool. It then calls the appropriate tool's func method to complete the task.
Note: I'm less sure of whether or not this is the right choice. It could work, but it needs more thinking before I really call this "good".
By using the ChainOfThought module for both planning and execution, we're enabling the workers to think through the problem, break it down into smaller steps, and then select the right tools to accomplish each step. What's awesome here is that we can define them inline or as a formal Signature.
class Worker2(dspy.Module):
    def __init__(self, role:str, tools:List):
        self.role = role
        self.tools = dict([(t.name, t) for t in tools])
        self.tool_descriptions = "\n".join([f"- {t.name}: {t.description}. To use this tool please provide: `{t.requires}`" for t in tools])
        self._plan = dspy.ChainOfThought(Plan)
        self._tool = dspy.ChainOfThought("task, context -> tool_name, tool_argument")

        print(self.tool_descriptions)
    def plan(self, task:str, feedback:Optional[str]=None):
        context = f"Your role:{self.role}\n Tools at your disposal:\n{self.tool_descriptions}"
        if feedback:
            context += f"\nPrevious feedback on your prior plan {feedback}"
        input_args = dict(
            task=task,
            context=context
        )
        result = self._plan(**input_args)
        return result.proposed_plan
    def execute(self, task:str, use_tool:bool):
        print(f"executing {task}")
        if not use_tool:
            return f"{task} completed successfully"

        res = self._tool(task=task, context=self.tool_descriptions)
        t = res.tool_name
        arg = res.tool_argument
        if t in self.tools:
            complete = self.tools[t].func(arg)
            return complete
        return "Not done"
Overall, the improvements to the Worker class make the agent application more intelligent and flexible, setting the stage for more advanced functionality in the subsequent sections.
Creating Specialized Tools
For the assistant, we've created two tools: email_tool and schedule_meeting_tool. The email_tool allows the assistant to send and receive emails, while the schedule_meeting_tool can be used to schedule meetings. Both tools have a name, a description, a requires field that specifies the input needed, and a func field that defines the tool's functionality.
email_tool = Tool(
    name="email",
    description="Send and receive emails",
    requires="email_address",
    func=lambda x: f"Email sent to {x}"
)
schedule_meeting_tool = Tool(
    name="schedule meeting",
    description="Schedule meetings",
    requires="meeting_details",
    func=lambda x: f"Meeting scheduled on {x}"
)
Note we added an edge case for the janitor, where they need to report maintenance issues.
cleaning_supplies_tool = Tool(
    name="cleaning supplies",
    description="List of cleaning supplies needed",
    requires="cleaning_area",
    func=lambda x: f"Need supplies for {x}"
)
maintenance_report_tool = Tool(
    name="maintenance report",
    description="Report maintenance issues",
    requires="issue_description",
    func=lambda x: f"There's too much work for one person. I need help!"
)
For the software engineer, we've included a code_compiler_tool to compile code and a bug_tracker_tool to track and report bugs.
code_compiler_tool = Tool(
    name="code compiler",
    description="Compile code",
    requires="source_code",
    func=lambda x: "Code compiled successfully"
)
bug_tracker_tool = Tool(
    name="bug tracker",
    description="Track and report bugs",
    requires="bug_details",
    func=lambda x: f"Bug reported: {x}"
)
Finally, we've created tools for the cook, including a recipe_lookup_tool to look up recipes and a kitchen_inventory_tool to check the kitchen's inventory.
recipe_lookup_tool = Tool(
    name="recipe lookup",
    description="Look up recipes",
    requires="dish_name",
    func=lambda x: f"Recipe for {x} found"
)
kitchen_inventory_tool = Tool(
    name="kitchen inventory",
    description="Check kitchen inventory",
    requires="ingredient",
    func=lambda x: f"Inventory checked for {x}"
)
After defining these specialized tools, we've assigned them to the corresponding workers. This allows each worker to access the tools they need to perform their specific tasks.
workers = [
    Worker2("assistant", [email_tool, schedule_meeting_tool]),
    Worker2("janitor", [cleaning_supplies_tool, maintenance_report_tool]),
    Worker2("software engineer", [code_compiler_tool, bug_tracker_tool]),
    Worker2("cook", [recipe_lookup_tool, kitchen_inventory_tool])
]
By providing these examples, we've demonstrated how you can create a variety of tools to support different roles and functionalities within your agent application.
Parsing the Plan
Someone is going to kill me for writing this but yes... I used instructor. Instructor is great for this kind of thing. I could just parse the plan with a regex or string formatting but instructor allows me to do the same without having to deal with the details / nuances.
To actually parse the plan, we'll use the Instructor library, which provides a convenient interface for interacting with large language models like GPT-3.5. The get_plan function takes in the plan text and some additional context, then uses Instructor to generate a ParsedPlan object that we can work with. This allows us to easily extract the individual tasks and subtasks from the plan, setting the stage for the next steps in our agent application.
from pydantic import Field
import instructor
from openai import OpenAI
_client = instructor.from_openai(OpenAI(base_url="http://0.0.0.0:4000/"))
class SubTask(BaseModel):
    action:str
    assignee: str
    requires_tool: bool = Field(..., description="Does this require the use of a specific tool?")

class Task(BaseModel):
    sub_tasks:List[SubTask]

class ParsedPlan(BaseModel):
    tasks: List[Task]
def get_plan(plan:str, context:str):
    return _client.chat.completions.create(
        response_model=ParsedPlan,
        model="gpt-3.5-turbo",
        messages=[
            dict(role="system", content="You help parse markdown into a structured format."),
            dict(role="user", content=f"Here is the context about the plan including the available tools: \n{context} \n\n The plan: \n\n {plan}")
        ],
    )
Implementing the Boss Class
The Boss is a key component in our agent application, responsible for overseeing the work of the agents (or workers) and ensuring that tasks are properly assigned and executed. Let's dive into the implementation of the Boss class.
We initialize the "Boss" object with a base context, a list of direct reports (workers), and a language model. The base context provides the overall context for the Boss's decision-making, and the direct reports are stored in a dictionary for easy access.
We also generate a report of the capabilities of each direct report and store it in the report_capabilities attribute - this basically just gives the "boss" an idea of what the workers can do.
class Boss(dspy.Module):
    def __init__(self, base_context:str, direct_reports=List, lm=bss):
        self.base_context = base_context
        self._plan = dspy.ChainOfThought("task, context -> assignee")
        self._approve = dspy.ChainOfThought("task, context -> approve")
        self._critique = dspy.ChainOfThought("task, context -> critique")
        self.reports = dict((d.role,d) for d in direct_reports)
        self.lm = lm
        report_capabilities = []
        for r in direct_reports:
            report_capabilities.append(f"{r.role} has the follow tools:\n{r.tool_descriptions}")
        self.report_capabilities = "\n".join(report_capabilities)
        print(self.report_capabilities)
    # The `critique` method allows the Boss to provide feedback on a proposed plan. It takes the task, the proposed plan, and an optional extra context as input, and uses the `_critique` chain of thought to generate a critique.
    def critique(self, task:str, plan:str, extra_context:Optional[str]=None):
        context=self.base_context
        if extra_context:
            context += "\n"
            context += extra_context

        crit_args = dict(
            context=context,
            task=task,
            proposed_plan=plan)
        with dspy.context(lm=self.lm):
            result = self._critique(**crit_args)
        return result.critique
    # The `approve` method allows the Boss to approve a proposed plan. It takes the task, the proposed plan, and an optional extra context as input, and uses the `_approve` chain of thought to generate an approval decision.
    def approve(self, task:str, plan:str, extra_context:Optional[str]=None):
        context=self.base_context + "\n You only approve plans after 2 iterations"
        if extra_context:
            context += "\n"
            context += extra_context

        approval_args = dict(
            context=context,
            task=task,
            proposed_plan=plan)
        with dspy.context(lm=self.lm):
            result = self._approve(**approval_args)
        return result.approve
    # The `plan` method is the core of the Boss class. It takes a task as input and uses the `_plan` chain of thought to determine which of the direct reports should be assigned to the task. The method then iterates through the assignment process, providing feedback and critiques until a suitable assignee is found. Once the assignee is determined, the Boss calls the `plan` method of the assigned worker to generate a plan for the task. The Boss then approves the plan, providing critiques and feedback as necessary, until the plan is approved.
    def plan(self, task:str):
        # note: this function is a mess, don't judge me
        # I haven't built an agent framework before, so I'm not sure of the ergonomics
        # and best approach
        context=self.base_context + f"Here are your direct report capabilities: {self.report_capabilities}"

        plan_args = dict(
            context = context,
            task=f"Which person should take on the following task: {task}"
        )
        assignee = self._plan(**plan_args).assignee
        is_assigned = assignee.lower() in self.reports
        report = None
        print("assigning")
        for x in range(3):
            if is_assigned:
                report = self.reports[assignee]
            else:
                context += f"\n\n you tried to assign to {assignee} but that's not a valid one. Think carefully and assign the proper report"
                plan_args = dict(
                    context = context,
                    task=f"Which person should take on the following task: {task}"
                )
                assignee = self._plan(**plan_args).assignee
        assert report, "Failed to assign"
        print("assigning complete")
        print("planning")
        reports_plan = report.plan(task)
        with dspy.context(lm=self.lm):
            approval = self.approve(task, reports_plan)
            is_approved = "yes" in approval.lower() and "no" not in approval.lower()

        for x in range(2): # I created cycles to simulate failures, this might be a while loop in production
            print(f"Cycle {x}: {approval}")
            if is_approved:
                break
            feedback = self.critique(task, reports_plan)
            feedback = f"Prior plan: {reports_plan}\n Boss's Feedback: {feedback}"
            print(feedback)
            reports_plan = report.plan(task, feedback)
            print("new plan===>")
            print(reports_plan)
            complete = f"{feedback}\n\nNew plan:\n\n{reports_plan}"
            approval = self.approve(task, reports_plan)
            is_approved = "yes" in approval.lower()
        print("Now working")
        parsed_plan = get_plan(reports_plan, f"The assignee is: {assignee}. The rest of the team is: {self.report_capabilities}")
        results = []
        for task in parsed_plan.tasks:
            for sub_task in task.sub_tasks:
                task_result = self.reports[sub_task.assignee].execute(sub_task.action, sub_task.requires_tool)
                results.append(f"\n{task_result}: {sub_task.action}\n")
        print("end result")
        print("\n".join(results))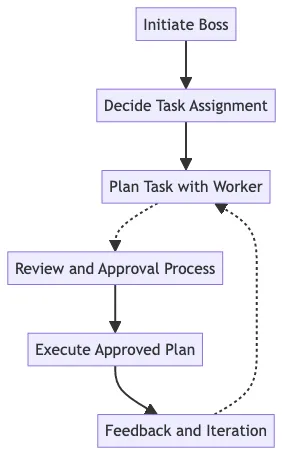
This implementation of the Boss class demonstrates the interaction between the Boss and the workers, and how the Boss can provide oversight and guidance to ensure that tasks are properly planned and executed.
There's so much more opportunity for complexity here, but then we'd just be building an agent framework.
Putting it All Together
Now that we've covered the key components of our agent application, let's put it all together and see it in action. We'll create an instance of the Boss class and demonstrate how to use the plan method to assign tasks to the workers and execute the plan.
First, we'll create a Boss instance and pass in the workers we've defined earlier:
b = Boss("You are a boss that manages a team of people, you're responsible for them doing well and completing the tasks you are given.", workers)In this example, we're passing in a description of the boss's role and responsibilities, as well as the list of workers that the boss will manage.
461: Next, we'll call the plan method in the boss instance and provide a task to be completed:
b.plan("clean up the yard")When we call the plan method, the boss will parse the task, assign subtasks to the appropriate worker, and coordinate the execution of the plan.
The boss provides feedback on the plan for the worker.
What's cool here is that the boss has more context (e.g., more powerful model) than the worker.
This example demonstrates the core functionality of our agent application, but there's still a lot of potential for optimization and extension. We'll explore some of those possibilities in the conclusion.
Conclusion
Well this was a couple of hours to get done. I'm not sure if this is the best way to do it, but it's a way to do it.
The thing that I didn't show / have time for
This is all great, nothing that crazy here. The thing that I didn't show, but I wish I had time for, was the ability to "train" these agents via optimization. You could imagine running a DSPy optimization that optimizes each model with bootstrap.
This takes a bunch more work, but that's where the real power of DSPy comes in.
An alternative approach
LLMClient is DSPy based framework in Typescript. It approaches the problem in a different way, but it's a great example of how you might do it.
By basically giving a single signature to each agent, you can create a somewhat simpler system. I discovered this after writing my own, but the reader should definitely check it out if it's of interest.
const researcher = new Agent(ai, {
  name: 'researcher',
  description: 'Researcher agent',
  signature: `physicsQuestion "physics questions" -> answer "reply in bullet points"`
});
const summarizer = new Agent(ai, {
  name: 'summarizer',
  description: 'Summarizer agent',
  signature: `text "text so summarize" -> shortSummary "summarize in 5 to 10 words"`
});
const agent = new Agent(ai, {
  name: 'agent',
506: description: 'An agent to research complex topics'
  signature: `question -> answer`,
  agents: [researcher, summarizer]
});
agent.forward({ questions: "How many atoms are there in the universe" })
The actual conclusion
In this tutorial, we've taken a first step into the world of DSPy Agents by building a basic agent application. I borrowed from some existing agent frameworks (like CrewAI).
The low abstraction overhead of DSPy has given us a lot of flexibility in designing and customizing our agent application but that also means more decisions.
Something like CrewAI is going to "feel" a lot simpler.
While we've covered a lot of ground, there's still plenty of room for exploration and improvement
The great thing about this tutorial is that you can learn a lot by reading through and playing with the code.
The not-so-easy part is that there's still a lot of work to be done to create a truly robust and capable agent application. But that's part of the fun, right?
I'd love to hear about your experiences and any feedback you have. Feel free to reach out and share your thoughts or ask questions. Happy coding!
In future posts, we'll dive even deeper into topics like prompt optimization, fine-tuning, Suggestions, Assertions and other advanced use cases.
If you like this content, follow me on twitter for more! I'm posting a ton about and providing a lot of "hard earned" lessons that I've gotten from learning the material.